The Pike13 Client Kiosk is a dedicated tablet app that streamlines your front desk. It acts as a self-service station where:
- New Clients can create accounts, take profile photos, and sign waivers.
-
Existing Clients can quickly check in for classes or appointments.
Note: The Kiosk is for attendance and registration only. Clients cannot use it to book new appointments or make purchases.
Businesses can choose to use the Client Kiosk for both new client sign-up, class sign-in or only check in for services they already enrolled in. A sign-in code is created for each new client and they can use it to sign in quickly.
In This Article
- Who can use this feature?
- Client Kiosk Setup
- Signing a Client In
- Signing Up Clients and Their Children
- Logging Out of the Client Kiosk
- Changing Client Kiosk Settings
Who can use this feature?
- Pike13 Plans: ✅Premium, ✅Advanced, ✅Essential
- User Roles: ✅Primary Owner, ✅Owner, ✅Manager, ✅Staff, ✅Limited Staff
Client Kiosk Setup
-
Open the Pike13 Client Kiosk app on your iPad or tablet.
-
Log in with your Staff email and password.
-
Select Location: If your business has multiple locations, choose the one this kiosk serves.
-
Select Mode: Choose how you want the kiosk to function:
-
Sign In Only: Best for express check-in stations.
-
Sign Up Only: Best for registration stations.
-
Both: Allows clients to choose between signing in or signing up.
-
Check In for Enrolled Only: Restricts check-in to clients who have already booked a spot in advance.
-
To sign out tap the upper left corner of the screen, then tap ![]() . On the first setup page select Sign Out.
. On the first setup page select Sign Out.
Tip
When mounting your tablet in a display stand, ensure the holder does not block the front-facing camera. Clients can use this to scan QR codes and take profile photos.

Signing a Client In
Clients can identify themselves using three methods:
-
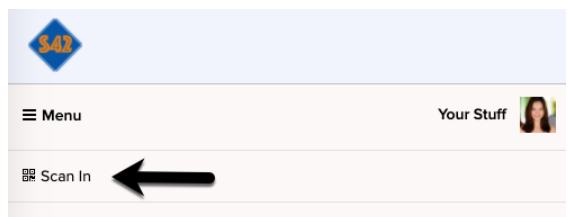
Scan QR Code: Clients can present the digital barcode found in their Pike13 Client App (or Apple Wallet) to the camera.
- From the client's mobile profile, select Your Stuff > Scan In.
- On an iPhone, clients can store their QR code in their Apple Wallet.
-
Phone Number: Enter the phone number associated with their profile.
-
Email Address: Enter their login email.
Check-In Logic
-
Pre-Enrolled: If the client is already on the roster for a class occurring soon, they are automatically marked as "Attended."
-
Drop-In: If they are not yet enrolled, the Kiosk will display a list of upcoming classes. The client taps the class they wish to join and selects Finish.
Signing Up Clients and Their Children
The Kiosk walks new visitors through the entire registration process.
-
Tap Sign Up.
-
Enter Email Address.
-
Who is signing up?
-
Myself: The adult is the student.
-
Myself + Dependent: Parent and child are both taking classes.
-
Dependent Only: Parent is signing up a child (but not taking classes themselves).
-
-
Profile Info: Enter Name, Birthday, Phone, etc.
-
Photo: The Kiosk prompts the client to snap a profile photo.
-
Note: Clients can retake the photo if they don't like it.
-
-
Waivers: The client reviews and signs the digital waiver on screen.
-
Minors: If signing up a dependent, the Guardian Waiver will appear for the parent to sign.
-
-
Tap Finish or Sign Up Another Dependent if adding siblings.
Signing Out of the Client Kiosk
-
To sign out tap the upper left corner of the screen, then tap
 .
. -
Select Sign Out.
Changing Client Kiosk Settings
- Tap the upper left corner of the screen, then tap .
- Make adjustments as necessary.